
Video Tutorial Forthcoming
In this Project I present an end-to-end framework for designing self-learning agents using Neural Networks within the video game engine Unreal. The mechanism by which this is accomplished is called Deep Reinforcement Learning – a machine learning approach that relies upon a system of rewards and punishments to sculpt an agent’s behavior.
Using this system an agent can easily be made to perform any combination of actions involving the objects in it’s environment simply by changing the reward function in the AI character Controller. This is the chief advantage of reinforcement learning, instead of having to hand-craft behaviors, one simply rewards the behavior they want to see and the agent learns by itself to perform the necessary sequence of actions to achieve the reward. In essence, this is how one might teach a dog to perform a trick using food rewards.
The same approach can be used to train an NPC, virtual assistant or even robots. A variety of intentional behaviors can be acquired through this system, including path finding, NPC attack and defense, and almost every behavior a human is capable of exhibiting while playing a video game.State-of-the-art implementations include those used to defeat best in class human players at Chess, Go and multiplayer strategy video games.
The Deep Q Neural Network Learning Engine *: The Learning Engine provided in this package is a Deep Q Neural Network. The number of hidden layers , neurons, learning rate and training epochs used by the neural network are all configurable via blueprints. The network uses a sequential model with a linear stack of layers. The Learning Engine generates an action prediction across a given set of states that the agent can occupy. It is an off-policy approach that breaks learning into an exploration and exploitation phase.
* The Learning Engine is a standalone executable contained within the project files and must be launched prior to play.
Fixed parameters of the Network include:
Activation Function: Relu
Output activation function: Linear
Optimizer: ADAM
Loss Function: Mean Squared Error
Note: GPU enabled training is currently unavailable, but it slated for a forthcoming release
Other Reinforcement Learning algorithms Such A2C and PPO are planned for future release. The Learning engine is a stand alone executable contained in folder “\Content\NeuroStudio\Assets\LearningEngine” and must be started prior to the commence of game play. Communication via the game and learning engine takes place via the SOCKET IO plugin.
Deep Reinforcement Learning primer:
If you are already familiar with the principles of Deep Q learning, feel free to skip this section.
Deep reinforcement learning allows one to take a reinforcement learning algorithm such as Q learning and use a Neural Network to scale up the environment to which that algorithm can be applied. In extremis – the environment which the algorithm trains upon can be the actual pixel input of the screen itself. This mirrors the way in which mammals such as humans and dogs learn from the contents of their visual field.
In a reinforcement learning technique such as Q learning, the algorithm must keep track of all combinations of environmental variables, actions and rewards in a table. Depending on the complexity of the environment and actions available to the agents, this can make such a table astronomically big. Even a few environmental elements interacting can quickly lead to combinatorial explosion. A Neural Network, in effect can act as a substitute for these complex tables. The combination of neural networks with reinforcement learning algorithms has given rise to the success of Deep Reinforcement learning. Examples include AlphaZero, AlphaStar etc.
The package provided is designed with a Q learning algorithm that uses a Tensorflow based Deep Neural Network to achieve scalable reinforcement learning. A basic understanding of Q learning will be helpful for successfully applying the deep reinforcement learning agent demonstrated here. In the link below you can find an introduction to vanilla Q learning in UE4 in which the agent solves a simplified version of the same task that it encounters in the present package: https://www.unrealengine.com/marketplace/artificial-intelligence-q-learning
At the very least you will want to familiarize yourself with the Q learning equation. The method by which Q learning achieves success at predicting which actions lead to rewards is called backward induction. Imagine a hiker who has lost the trail and is trying to find the way back to camp- she randomly picks a direction to move in, observes whether this action seemed to get her closer to the goal, and from this new vantage point decides how to value her last action. In effect, the agent uses a one-step look ahead to constantly update its value for state action pairs that have just taken place. We commonly know this as trial and error learning. In tabular Q learning this equation takes the form
Q(state, action) = Reward(state, action) + Gamma * Max[Q(next state, all actions)]
Where R(state, action) is any reward gleaned by the current action and gamma is a fixed discount rate between 0 and 1 which controls how much the agent values present rewards vs. future ones. Max[Q(next state, all actions)] also called the bellman update rule, makes the present value of the state action pair dependent on the next best future action that can be taken from this position. This is the “look ahead” part of the equation. In such a way, a reward that happens in the future can be chained backwards to the steps that got one there.
In a Deep Q Network, the neural network receives as input all of the environmental variables the agent is learning from as well information about the agent’s actions. This can be broken up into two sets of State Action Pairs
OldState(Obersvations about the Agents Environment, Previous Action)
NextState(New Obersvations about the Agents Environment, Next Action)
Plus any reward or punishment resulting from its actions.
In the example provided the state information is the location and body position of the agent in the form the action it just took, as well as the state of three colored lights that appear on the wall.
The basic method for Deep Q learning used here is as follows. First the Neural Network predicts values corresponding to each action available to the agent given its current state. In the example provided the agent has 8 possible actions at any given time. Initially the Neural Networks prediction about the value of these action given a certain state the agent is in will be random, but after the Agent receives a reward, it can form a more accurate estimate of the values of the previous state action pairs. The difference between its initial value estimates for each action and the new ones obtained after taking an action are used as a loss function to train the Neural network. After many game episodes and many epochs training the neural network, it gradually improves its estimate of state action pairs. To make a wining move the agent has only to run the network forward given his current state and take the action that is predicted to have the highest value.
You don’t necessarily need to understand the details of how the Learning engine works to make use of it, but you will need to be clear about what elements the agents is learning from in the environment, the actions it can take, and the rewards it can receive. These will be covered in detail in the blueprint explanations below.
Having an understanding of Neural Networks and principles such as over fitting, will also be helpful when selecting the hyper parameters of your neural network. Training neural networks is as much an art as a science, since many parameters of the network effect learning.
A further wrinkle: Catastrophic Forgetting and Experience Replay
One result of using Neural Networks for Q learning is that recent experiences will tend to eclipse older ones, leading to short sighted agents that forget previously learned strategies in favor of whatever behavior is the “flavor of the day”. This can be overcome by a technique called Experience replay. Rather than train the network on only a single update of state action pairs, we create a batch of such experiences and then train the network over this entire batch. This way the neural network reflects a longer term horizon of learning rather than a single episode. This surmounts the “catastrophic forgetting” dilemma. The exact size of these batches is up to you and can be configured in blue prints.
A number of other hyper parameters such as the depth of neural network(number of layers) and the number of neurons, also effect learning. We can adjust the learning process with these flywheels. While learning with tabular Q learning has only 3 parameters (gamma, the learning rate, and the reward) Deep Q learning adds several additional parameters which affect the agent’s ability to learn new strategies. These include
- The depth and size of the neural network
- The activation function of the neural network
- The type of optimizer used
- Gamma (The discount rate of the future)
- The batch size of the experience replay
- The number of training epochs
- The learning rate
- And the size of the reward
While Deep Reinforcement Learning allows agents to learn in more complex environments, they often do so more slowly than simpler Q learning agents that do not use Neural Networks. It can also be more difficult to “tune” the agent’s behavior given the larger number of parameters that affect learning.
On the other hand, using Neural Networks allows agents generalize their strategies – that is they will apply a learned strategy to a wide variety of environmental states that resemble the one they may have been rewarded for. In tabular Q learning, the learned strategy would only be invoked in the exact state for which they have an associated reward.
In the present example from this package, it took about twice the exploration sessions for the agent to learn the correct strategy using a Deep Q learning network rather than tabular Q learning. This might have been significantly reduced through further tweaking of the neural network. One potential pitfall to using Neural Network for Reinforcement learning is that of over fitting, in which a sub optimum behavior gets reinforced repeatedly. Using Neural Network for Reinforcement Learning can therefore take some finesse, and while behaviors are no longer laboriously handcrafted with if-then-else statements, tweaking the hyper parameters of the neural network to get the desired result can be an exhaustive and exhausting process.
A more detailed explanation of the various intricacies involved in deep reinforcement learning can be obtained from the OpenAI website, Spinning up in Deep RL: https://blog.openai.com/spinning-up-in-deep-rl/
Example Provided: The Extended Match to Sample Task
In the example provided we use deep reinforcement learning to solve a match to sample puzzle in which the NPC learns that it must activate a switch within the game environment at the same time that a combination of lights are on in order to receive a reward at another location. Similar puzzles have been used in a wide variety of animal learning experiments that explore instrumental and associative learning abilities. This examples uses a more complex form of such a puzzle then used in the tabular Q learning UE4 package. While that match to sample task required learning from only a single light, in this learning scenario three lights are used and the agent also has access to do additional actions such as jumping. This drastically increases the combination of elements that the agent must learn from and therefore would be unsuitable for vanilla Q learning.
The key point in such a learning task is that the agent must learn to predict that it can take an action to receive a reward only during specific circumstance. In this case, when the green light is on and it touches the cone and then proceeds to the gold food bowl while jumping. The same action taken when the light is off will not generate the reward. However if the green light is off, and it does the same process without jumping, it will receive a reward as well. Thus multiple rewards can be used for different combinations of actions and environmental cues.
The setup for the match to sample task is that NPC begins with a training phase in which it randomly travels from one of four locations, 3 food bowls and one switch, represented by balls and a cone respectively. During training period, it learns associations about the values of each of these state action pairs, how they are affected by the lights that periodically turn on and off as well as the agents body position in regard to jumping or not jumping.
If successful, after training the agent displays intentional behavior by first going to the switch(cone) and then going to the food reward bowl in the correct body position(jumping or not). This method can be used to provide a wide variety of intentional behaviors, including avoiding enemy players, collecting health points, etc.
I assume a basic familiarity with the Unreal Engine game blueprint environment, which if lacking, can be obtained from the very excellent tutorial series on the subject available on YouTube.
Setup:
The NeuroStudio project provided requires the SOCKETIO Plugin, available for free through the Unreal Engine Marketplace.
- If you do not have the SOCKET IO plugin, you can download And Install the SocketIO Client plugin from UE Marketplace
https://www.unrealengine.com/marketplace/socket-io-client
- Open the DeepLearning NPC folder from the Contents Directory
Assets Contained in DeepLearningNPC Folder:
- 1 Custom Structure – NeuralNetCustomStruct
- 1 AI Behavior Tree
- 1 AI Blackboard
- 1 AI Character Controller
- 1 AI Character Blueprint
- 3 Blueprints for the Point Lights
- 1 Blueprint for the food bowl
- 1 Body Action Group Custom structure
- 1 Walking Action Group Custom structure
- 1 Learning Engine Custom structure
- The Blueprints for the lights, food, bowl, action groups relate specifically to this example. The other elements are universal and form a template for applying the learning engine to other agents.
- The Learning Engine itself is a standalone executable contained in the Content/Learning Engine folder and must be run prior to game play
- The main asset you will be customizing to change an Agent’s behavior is the AI Character controller. This contains a variety of functions necessary for the agent to learn new behaviors, including functions for setting the Reward, creating the Agents observations about its environment, and passing data to the learning engine.
Getting to the Know the Assets: Exploring an Example

NeuroStudio builds upon the third person template provided in the unreal engine example files. From here, we have introduced 3 spheres and placed them at the corners of the environment, as well as a cone that will function as the “switch” for the agent to press in activating the food bowl. 1 of the spheres will function as food bowl for the NPC, the others are simply random destinations for it to travel to while wandering the level. We have also added three point lights directed towards one of the walls that will activate the food bowl at specific intervals in combination with the agents behavior. Next we have created a nav mesh bounds volume that will cover the entire floor space of the scene, which will allow the NPC to move around the environment.
The third person character component has been modified so that our character can access the locations of the objects we have added to the level- that is the spheres and cone. To do so we create blueprint variables for them within the AI Character Blueprint. Inside AI Character Bp Blueprint we have added 4 actor variables and named them target(0-3). Having added these variables, we must now assign them targets within our level blueprint by clicking the AI character component and assigning each variable to its respective object within the level. Now they are linked up so they can be caste to from within the AI Character controller BP.
Next we introduce an AI_Blackboard and AI_Behavior Tree. These will control the actual movements of the NPC as it learns different behaviors. The AI Behavior tree is made according to the image below.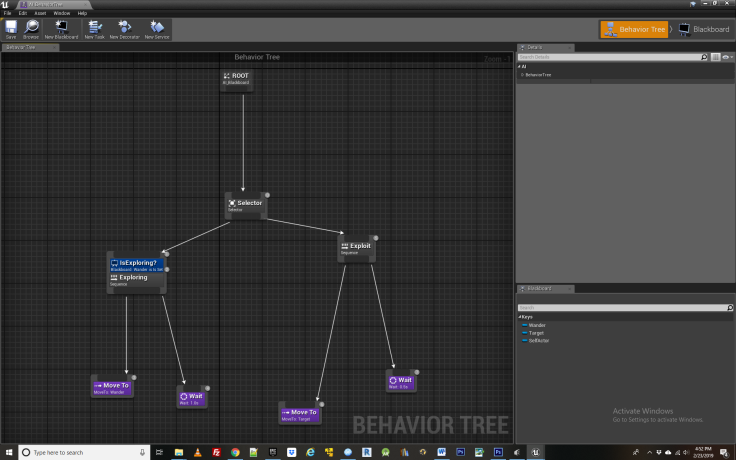
The AI Blackboard contains two variables- wander and target, which refer to the destinations for the NPC to travel to when it is in exploration and exploitation phase respectively. These destinations get updated according to the “brain” of the NPC which is located within the AI Character Controller BP.
Proceeding to the AI Character Controller BP, this is where the learning actually takes place. First we must add SocketIO functionality so the agent can communicate with the Neural Network Learning engine – an executable file located in Content\LearningEngine directory. To add SocketIO client we got to the components tab of our Character Controller BP, click on add component and find Socket IO client. Default Settings are used though it essential to make sure port 300 is selected as this is the what the DQN Learning engine located in the Libraries directory will connect to Blueprints through.
Step 1 Configuring the AI Character Controller BP
Functions Explained: Load Sensory Input, Environmental Controls, DefineActionSpace
To begin we use the OnConnect node from SocketIO Client to connect with the Learning Engine, called WinDQN.exe This must be launched prior to the beginning of play and communicates with the agent via the SOCKET IO plugin. A forthcoming plugin will allow you to automatically launch the learning engine at the beginning of play, for now it must be manually launch. Having connected to the Learning Engine via the Connect function of the SocketIO client , it will be up and running and ready to receive input from blueprints. At commence of gameplay, you may receive a warning that the learning engine is attempting to communicate with the game via the TCP/IP network. This is to be expected and must be granted for the learning engine to connect with blueprints. Once granted, there maybe a few second pause before training begins due time between reconnection attempts specified in the SOCKETIO plugin.
The next several Bind Event To Functions nodes are used to configure the Learning engine so that it knows what functions to run in blueprints when it receives certain events from the Learning Engine such, as logging loss values, and most importantly the “Receive Prediction” function. If you wish to see the loss function of the Neural Net while it is training, make sure the EnableVerboseMode bool variable is set to true. When making your own Agent, you will require these same bind to event functions, so that the learning engine can communicate with the correct blueprint functions.
The next step is to build out the environmental controls that govern how things like lights etc behave in the game. This is located inside the function labeled “Load Sensory Input”, shown below.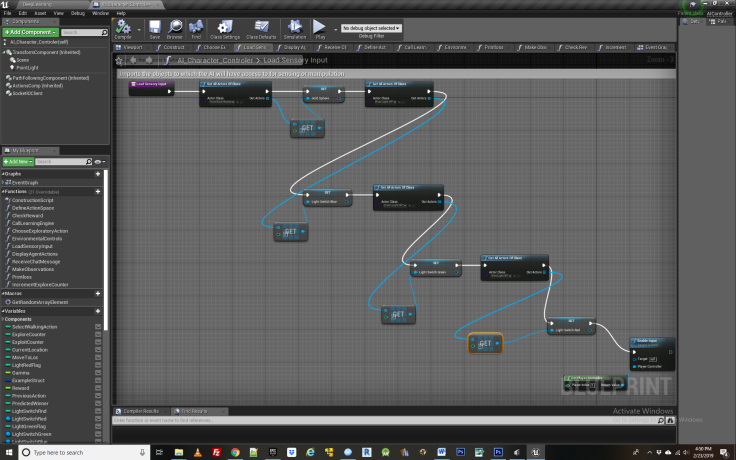
In this we link up some variables that will be needed to control the lights and the changing of the food bowl skin. We do this by assigning these variables instances of the blueprints to which they correspond. Then we must create some logic to control how the lights effect the food bowl. For convenience and modularity this has also been located within the AI character controller BP in the environmental controls function, below.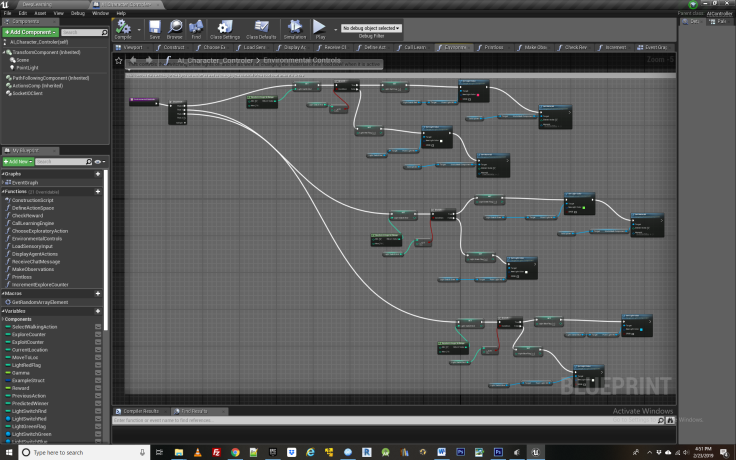
Environmental controls is the Blueprint function which governs the transition of elements in the environment, specifically the logic for when certain lights are on or off. This doesn’t need to be located within the Character control blueprint per say but for the agent to access these variables easily and observes their state, it is convenient to do so. Most importantly for this example, the Boolean C branch node is used so that there is a fifty percent chance the green light will be on during training and a 50 percent chance it will be off. The other lights are observed by the agent but they don’t effect whether it gets rewarded, and therefore cant be used to change its behavior.
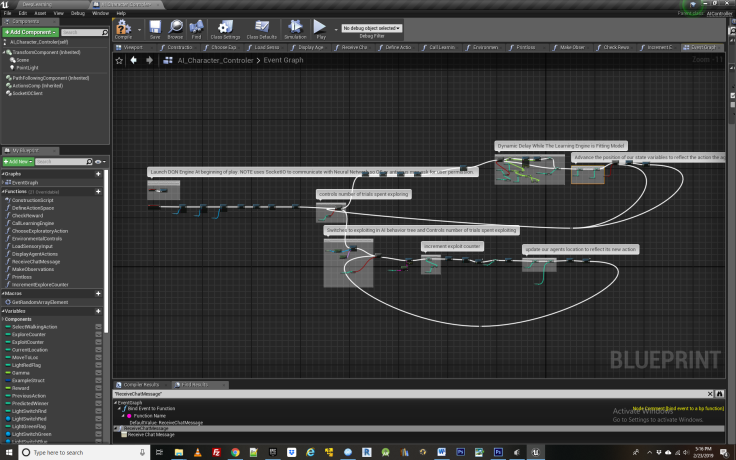
Returning to the event graph for AI Character controller, we next launch the behavior tree, which will run in the background waiting to receive signals from the Character Control and translate them into observable movements. Next we define the agent’s action space with the function DefineActionSpace, show below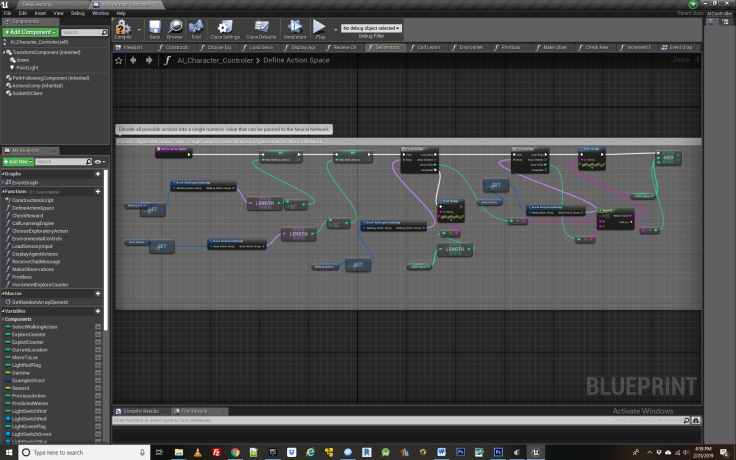
This is the first function crucial to the agent learning a behavior so let’s break it apart bit by bit. First, you will need to have created a Custom Structure for each class of actions available to the agent. In this case there are two – a walking action group corresponding to the 4 different locations the agent can travel to, and a body action group, corresponding to whether the agent is jumping or not. Further actions could be added to either group, or entirely new groups created. The essential thing is that each action group contain individual action instances that CANNOT combine at the same time with each other, but CAN combine with actions from other Action Groups. For example, an agent cannot be jumping and not jumping at the same time, but it can be jump and be traveling to one of the 4 locations at the same time. This is the distinction between Action instances and Action Groups and it essential for making correct use of the NeuroStudio Learning Engine.
In the blueprint function, after finding the number of items contained in each action group, we loop through these arrays to create an ActionSpace which is a mapping of all possible actions that an agent can manifest at a given moment. Each combination of actions gets its own unique identifier in the form of a key number. Since there are four locations the agent can travel to from the Walking Action Group, and two body states from the Body Action Group, The Action Space contains 8 possible key values, labeled one through 8.
When we later call the Neural network learning engine to provide it with state action pairs, it will do so with one of these 8 possible identifiers from the action space, and when the neural network returns a predicted best action given the agents current state, it will also take the form of a key value for one of these 8 actions.
Step 2 The Exploration Exploitation Trade Off
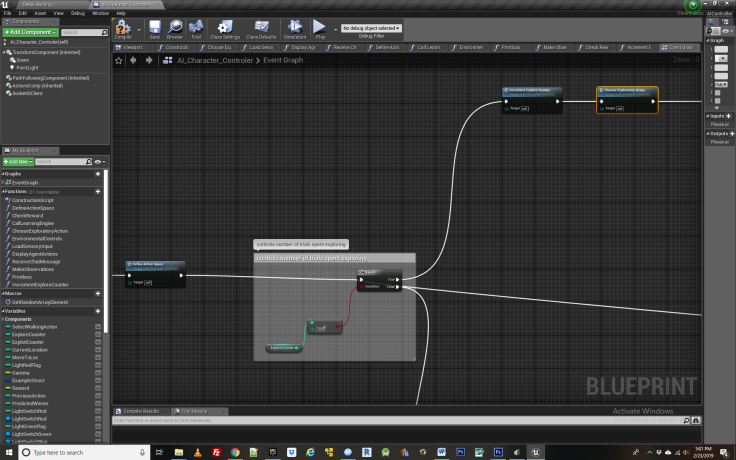
Next we encounter the blueprint logic to determine the tradeoff between exploration and exploitation for the agent. There are two main loops governing the agents learning process- the one for exploring and another for exploiting. The agent can be in one loop or the other at any given time. During exploration, the agents is simply observing and acquiring insight about its environment, actions and rewards, without taking actions based on that insight. Later during the exploitation loop, it uses its learning from the exploration phase to change its behavior and act “intelligently”. The exploration loop must always come prior to exploitation one if we hope to see any examples of learned behavior.
In Deep Q learning there is inescapable tradeoff between how much time the agent spends exploring vs. exploiting. This is called the exploitation/exploration trade off. In this example we have broken the tradeoff up such that the first 304 iterations of game play are spent exploring and the last 30, are spent exploiting. Logic wise, when transitioning to exploitation, we clear the Wander key in the blueprint which tells the AI blackboard to move from exploring to exploiting.
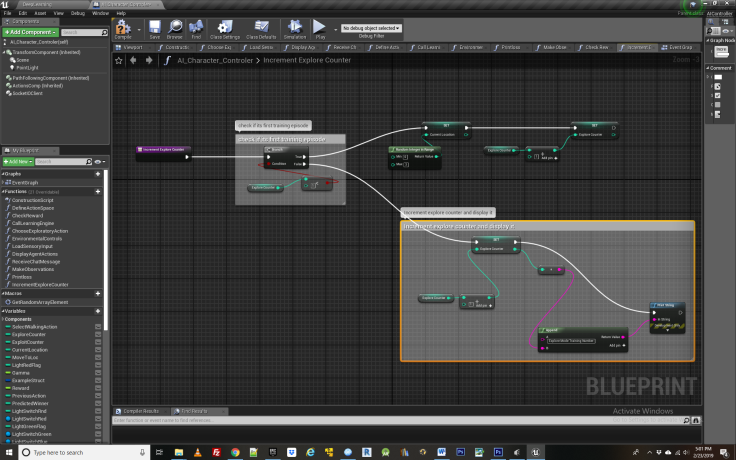
Step 3 – The Exploration Loop
Functions Explained: IncrementExploreCounter, ChooseExploratoryAction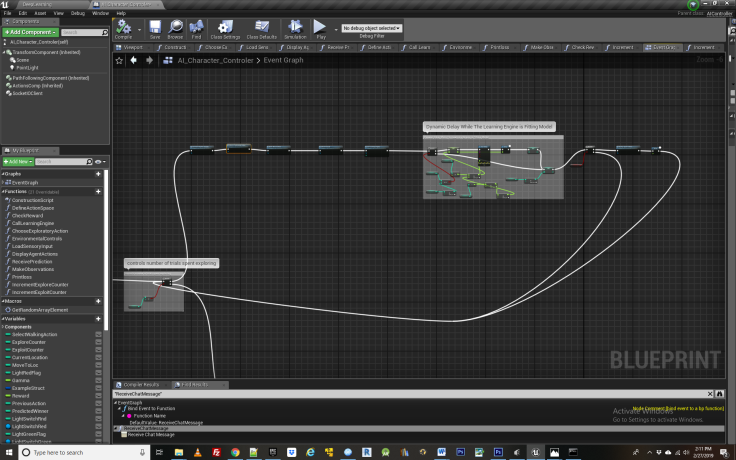
Here we encounter the core logic for exploring the environment, beginning with a counter that keeps track of how many iterations the agent has spent exploring and also picks a random location for it to start at. In this case it corresponds to the four different items in the environment- the three spheres and the one cone which is used as the switch that is necessary to visit before the agent can receive food from one of the spheres. This is all located in the “increment explore counter” function shown below.
The next function, called “choose exploratory action” contains logic to have the agent choose a random action in each round of play, as this is the entire basis of exploration.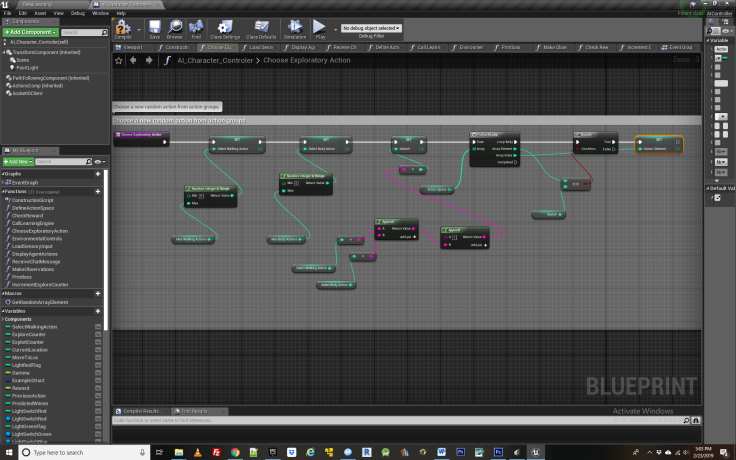
The intuition behind such exploration is to assign a number from 0 to 3 for each of the locations that the agent can travel to in search of food, including the switch it will use to activate the food reward bowl. We also pick a random body position for the agent, either jumping or not. The combination of these two action groups forms a unique “gestalt”. We than loop through the action space to find particular action combination and the action key value associated with it, which gets assigned to the variable “action selected”. This will later get passed to the neural network for training a model that will be capable of producing intelligent behavior and learning.
Step 4 – Making Observations
Functions Explained: MakeObservations

Having chosen a random action, we next encounter a function in the exploration loop for making observations about the environment. This logic is contained in the “make observations” function.
Looking inside this we see the first item of business is to transfer the agents old set of observations into a variable called previous observations, so that they can be later compared to the new set of observations in the learning engine. We then get the state of the three lights and assign them to a string value, followed by a 1. You can assign any number of observations to this one string so long as they take an integer value form. This is because we later convert this entire string into a decimal based number inside the learning engine by dividing it by the variable called ObsReducer. This makes it easier for the Neural Network to work with larger observation spaces.
Step 5 – Crafting a Reward
Functions Explained: CheckReward
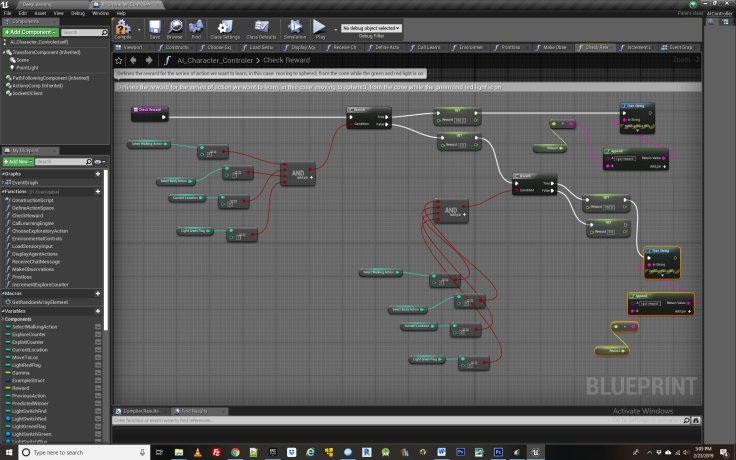
Next we encounter the function for defining and checking the agents reward – in this case traveling from the cone to the 3rd bowl while the green light is on AND the agent is jumping, or if the green light is off, NOT jumping. This could be any combination of lights or actions that the agent has access to. For comparison to tabular Q learning, you may wish to use same reward as was given in the Q learning example.
Step 6 – Calling the Learning Engine
Functions Explained: CallLearningEngine
 At last we have all the necessary ingredients assembled to actually call the Learning Engine and give the Neural Network the data necessary to learn from. This hand off is contained in the function “Call Learning Engine”. Since each variable passed is important in some respect, we will go through them one by one.
Last Action – contains the agent’s previous action, an essential ingredient in forming the Old state action value pair, which will be compared with the new state action pair after the agent takes a subsequent action.
Action Selected – This is the new action the agent randomly selected in “take exploratory action function”. It is used to update the agent’s position in the New State Value action pair as well as in the Bellman update from the Q value equation. Those calculations are all contained in the learning engine itself, and one doesn’t necessary need to concern oneself with these so long as the input data such as actions and observations is formed correctly.
Reward – this is the value of the reward or lack thereof achieved in the agents most recent action.
Gamma – the discount rate, or how highly the agent values future rewards compared to current ones. Often set to .8 or thereabouts. For tasks involving greater complexity and a long chain of steps before receiving the reward, it should be closer to 1. For simple tasks, it can be set closer to 0.
Observations – the agents most recent round of observations about its environment. This combines with the agents most recent action to form a New State Action pairing
Obsreducer – Used to convert the observation value into a decimal based number – easier for the neural network to train on in large observation spaces
Previous Observations – the agents previous round of observations about its environment, combines with the agents previous action to form the old State Action pairing.
Bufffer Size – Before picking a random group of state action observations to train the learning engine on, we have to fill a buffer with a number of such pairings. Buffer size must always be bigger than the batch size variable discussed next, as the batch size is the subset of the buffer which network gets trained on.
Batch Size – The randomly chosen sets of state action pairs from the buffer that the neural net gets trained upon.
Epochs – The number of training epochs the Neural Net uses when updating itself over the current batch of state action pairs. The more number of epochs, the faster Learning occurs, but the more vulnerable to over-fitting.
Learning Rate- This determines how fast the Learning Engine replaces its old model with the newly acquired one. Like with epochs, the closer this is to 1, the faster the model learns but the more vulnerable to “mistakes” and over fitting. It is a decimal between zero and 1.
Neural Network Nodes – This is the number of nodes contained in each layer of the neural network. The greater the number of nodes, the longer it will typically take to train the network but the more subtle the strategies it will be capable of learning. In the current implementation, each layer of the neural network must contain the same number of nodes. Care should be taken when selecting the number nodes as it will impact learning.
Neural Network Hidden Layers – This is the number layers contained in neural network. Like with nodes, the greater the number of layers, the longer it will typically take to train the network but the more versatility it will have in learning complex strategies. Care should be taken when selecting the number layers in the neural network as it will impact learning.
MaxActions – This is the total number of actions available to the agent at any given instant of game play. It is comprised of the combination of action instances from each action group. The neural network outputs a value across these possible actions, and the highest one is returned in the form of a predicted winner. This than becomes the basis of the Agents next move in the exploitation loop. MaxActions is automatically set in the DefineActionSpace function by getting the total members in the ActionSpace array.
Step 7 – Displaying Actions
Functions Explained: DisplayAgentActions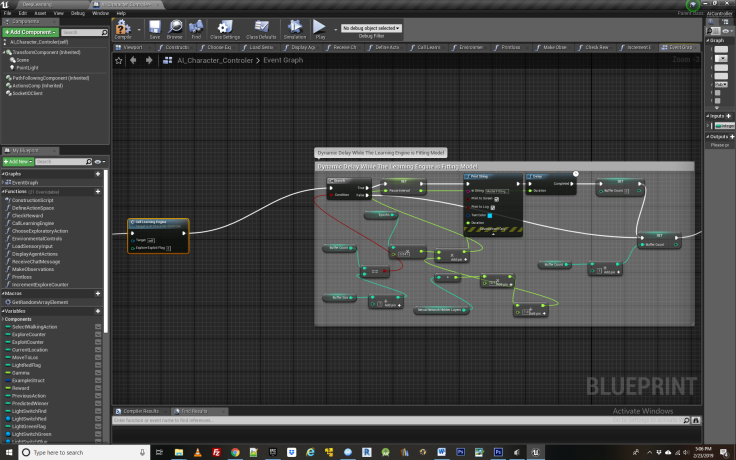
After calling the learning engine, there is a section of blueprint logic for creating a delay while the neural network is training over the data we just passed it. This is based importantly on how many training epochs are used. If the network is not returning sensible results, it could be because the model has not finished training before the next round of state action pairs has begun, in which case the values here may need to be tweaked to allow for a longer training delay.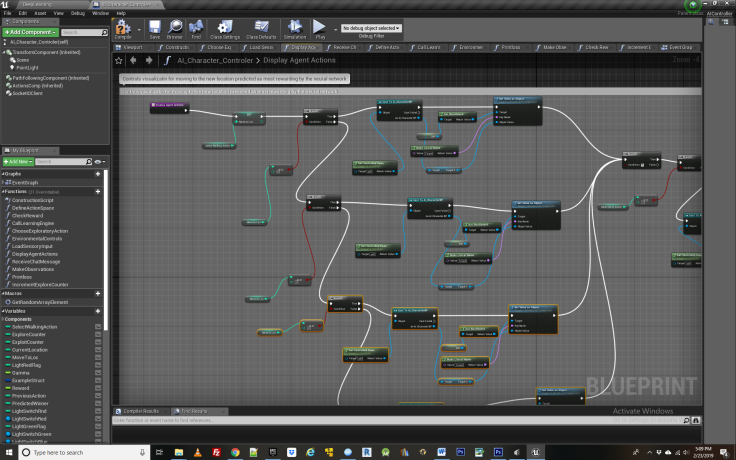
The last portion of the exploration loop is simply to check whether one is visualizing the training process or not. To quickly see the results of training or to debug the agent, one may simply want to set the Enable Training Visualization Boolean variable to false. This is followed by the “Display Agent Actions” function which simple moves the agent to its new place in the game as directed by the action it just took, along with a delay while it makes this transition. This visualization is not required if one just wants quickly create a large set of training data for the neural network to learn from before displaying the newly acquired behavior.
Step 8 – The Exploitation loop
Functions Explained: ReceivePrediction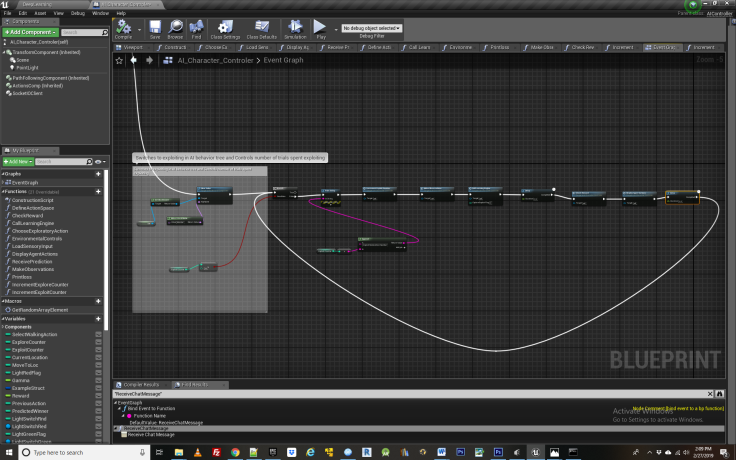
Following a given number of trials spent in the exploration loop, the agent switches to exploiting. During this time the agent uses the knowledge it has gained during exploration and starts making strategic decisions based upon it. Learning can now finally be demonstrated! The exploitation loop is framed up very similar to the exploration one, with a few minor differences. Importantly, instead of taking random actions, we first call the learning engine and get a predicted best action returned by the function “Receive Prediction”.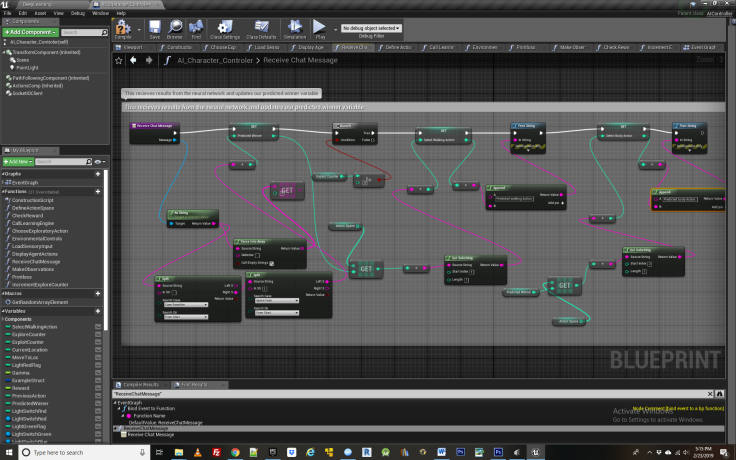
This received prediction then becomes the basis of the agent’s next action. Receive prediction is automatically initiated every time the learning engine get called, but in the exploration loop we were not doing anything with the results that were being returning. Now we use those results to change the agents behavior. This continues for as many iterations as one sets the exploit counter for. Rinse and repeat!
The AI Character controller is now fully configured and ready to deploy.
Running the Example:
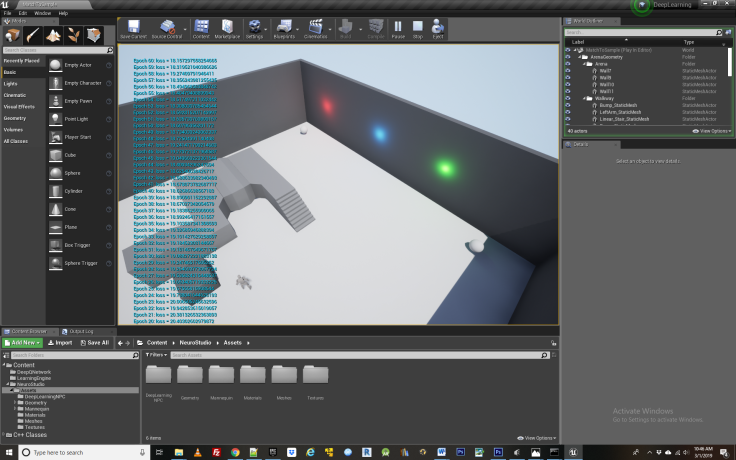
With default value for DisplayAgentActions set to false, and verbose mode enabled, values for state action pairs will quickly accumulate on the left hand portion the screen, along with the loss values logged from the Neural Network. The Agent will not actually move until the network is done training and enters the exploitation loop. At this point, depending on whether the green light on the wall defaulted to On or Off, the agent will begin accumulating rewards by traveling from the cone to the food bowl, incorporating jumps or not. Occasionally over-fitting may occur and the agent will not learn the correct action sequence to achieve rewards and instead perform some random behavior, usually jumping up and down at the food bowl. Such “mistakes” can occur in Reinforcement Learning because agent behavior is inherently probabilistic instead of deterministic in such a system.
Please feel free to post Questions or Comments on the UE4 Marketplace Comments Section or contact me directly at aaron.krumins@gmail.com

Leave a comment